
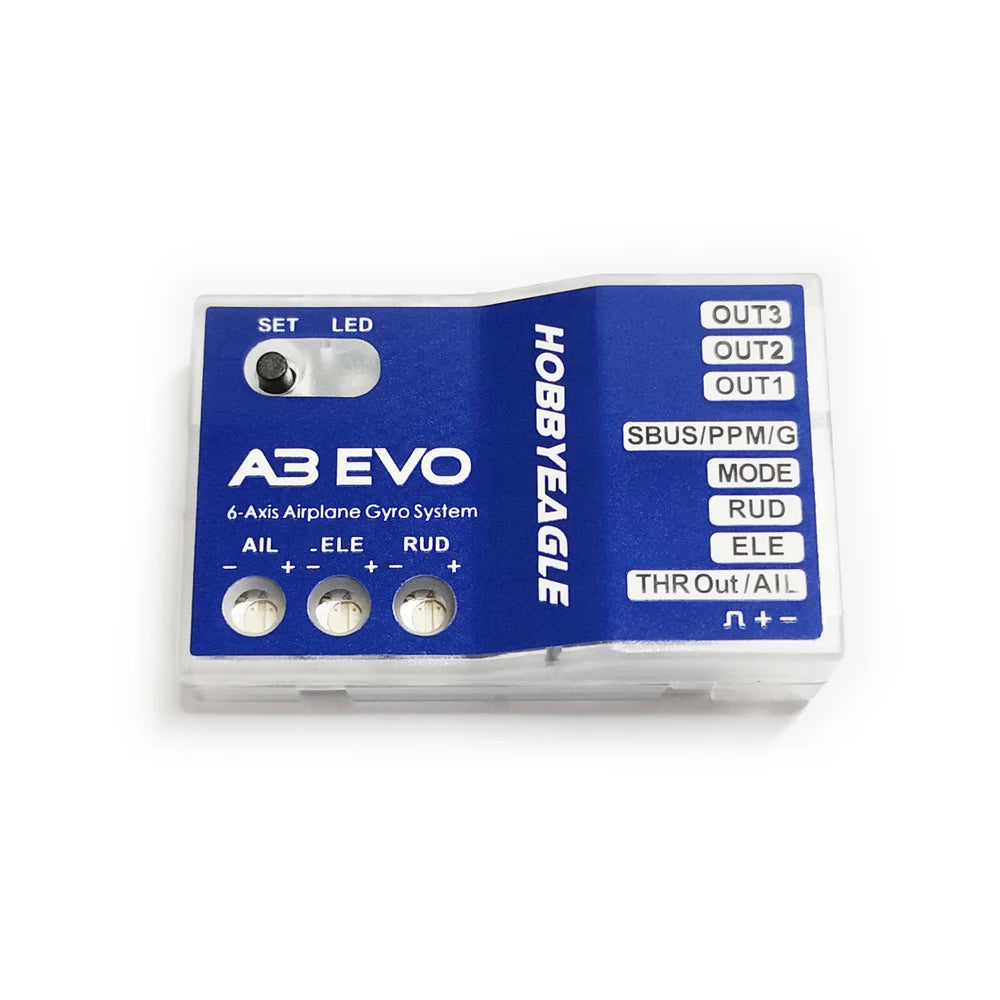
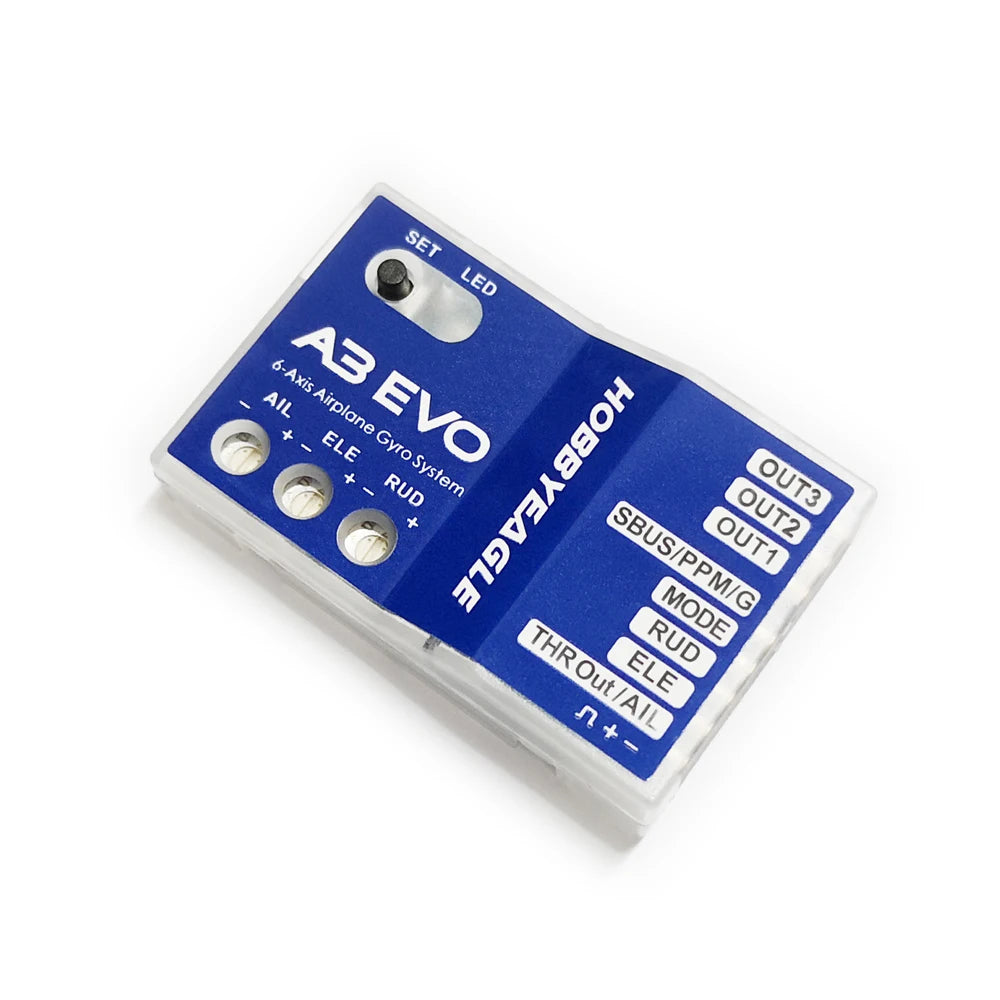


Description
The A3 EVO is the latest 6-axis gyro for airplanes, which is developed based on AVR platform and applies the high efficiency, concise and mature algorithm. Experience with previous gyros and introduces many new features such as PPM receiver support, separate 3-axis basic gain adjustment and the throttle output channel for mini serial receivers. The A3 EVO provides users with more powerful and better performance.
Features
-
4 Flight Modes: GYRO OFF Mode, NORMAL Mode, LEVEL Mode and HOVER Mode.
-
3 Wing Type: Standard, Delta-wing and V-Tail.
-
Standard PWM receivers, PPM and Futaba S.Bus receivers supported.
-
Throttle output channel provided when using the PPM or S.Bus mode.
-
Separate basic gain adjustment for Aileron, Elevator and Rudder.
-
Remote master gain supported.
Flight Modes
A3 EVO provides 4 flight modes which can be switched by a 3-position switch of the transmitter during flight. The color of the LED shows the current flight mode of the gyro while in use, as shown below.
|
 |
Solid Blue |
NORMAL Mode |
|
 |
Solid Red |
LEVEL Mode |
|
 |
Solid Blue & Red |
HOVER Mode |
|
 |
LED Off |
GYRO OFF Mode |
We provide you with 4 different mode allocations corresponding to the 3 positions of the switch in Item 7 of the Setting Menu,
the default setting is MODE 1: NORMAL – LEVEL – HOVER.
|
Modes |
Position-1 |
Position-2 |
Position-3 |
|
MODE-1 * |
NORMAL |
LEVEL |
HOVER |
|
MODE-2 |
NORMAL |
GYRO OFF |
LEVEL |
|
MODE-3 |
NORMAL |
GYRO OFF |
HOVER |
|
MODE-4 |
LEVEL |
GYRO OFF |
HOVER |
GYRO OFF Mode
When operating in GYRO OFF mode the gyro will be deactivated completely, and the airplane will be completely under the control of your transmitter as it was before installing the gyro. This mode is usually used for testing purpose only.
NORMAL Mode
The NORMAL mode, also known as the ‘Rate mode‘, is the most basic function of the gyro. It works based on the rotation rate control of each axis of the airplane. When operating in this mode, the gyro will only correct currently occurring rotational movements, a momentary reaction will be applied to the servos when the airplane rotating on corresponding axis, after rotation the servos will move back to their neutral position as soon as the airplane standing still immediately. The NORMAL mode can be used with nearly any size and type of airplanes. It can effectively improve the stability and precision of the airplane and reduce the stall point specially.
LEVEL MODE
The LEVEL mode is also known as the ‘Auto-Level mode‘, ‘Auto-Balance mode‘ or ‘Horizon mode‘. When operating in this mode, the airplane will be brought to horizontal position automatically when releasing the sticks. Different from the ANGLE mode, there is no maximum angle limitation in this mode and the airplane will be stabilized only when there is no specific control input from aileron and elevator sticks. This mode can be used if the pilot becomes disoriented and would like to save the airplane from crashing.
HOVER MODE
The HOVER mode, also known as the ‘Auto-Hover mode‘, provides the same functionality as the LEVEL mode. The only difference is that when you release the sticks, the airplane will be brought to vertical position (nose up) and keeps hovering. This mode is designed to help you to learn hovering maneuver and reduce the probability of crashing.
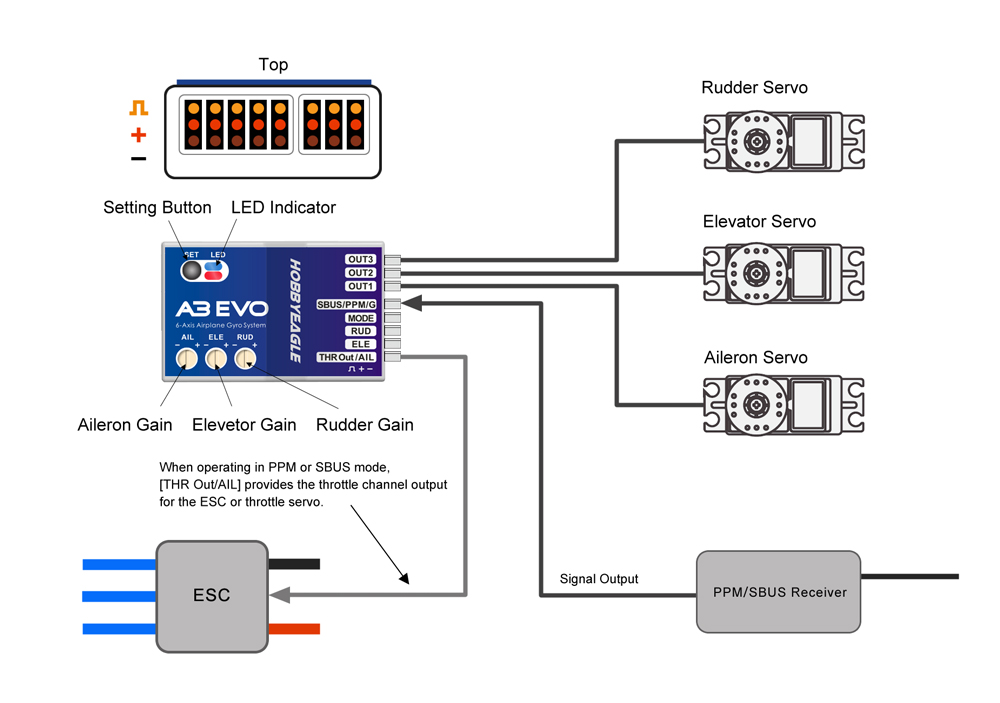
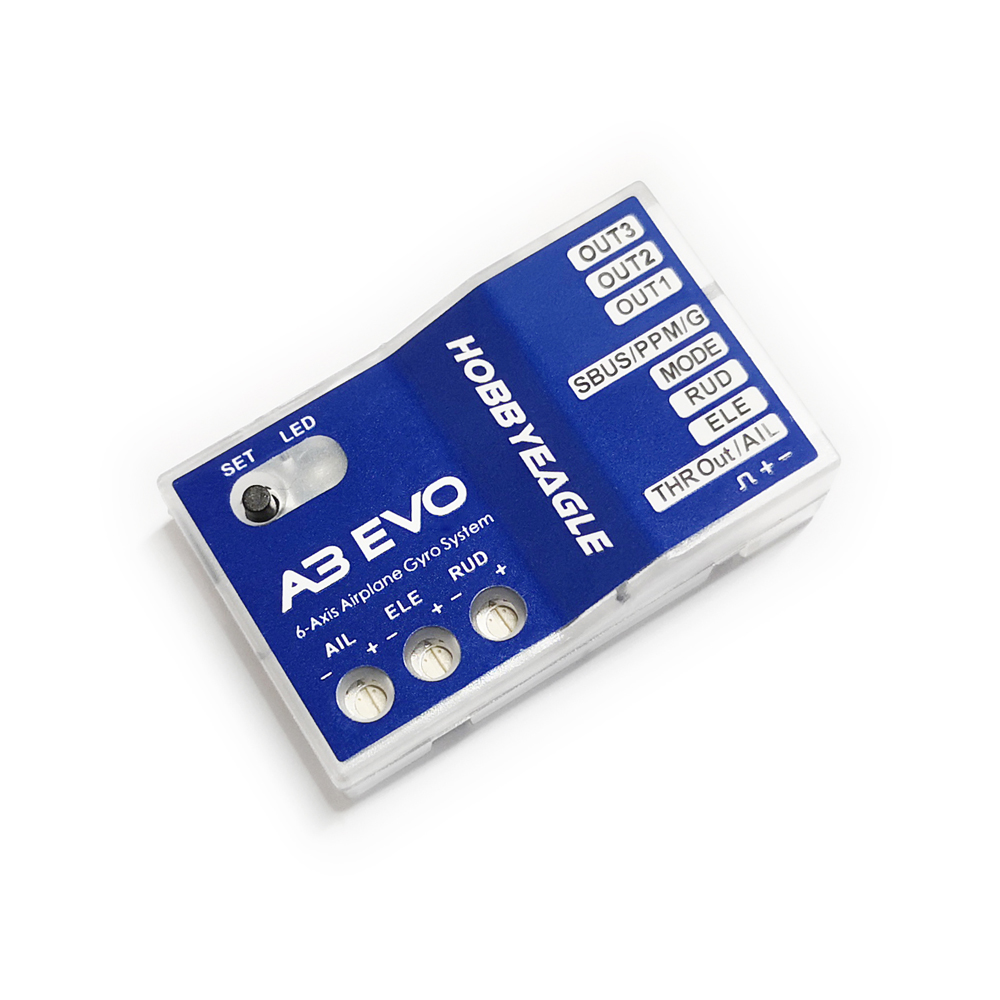
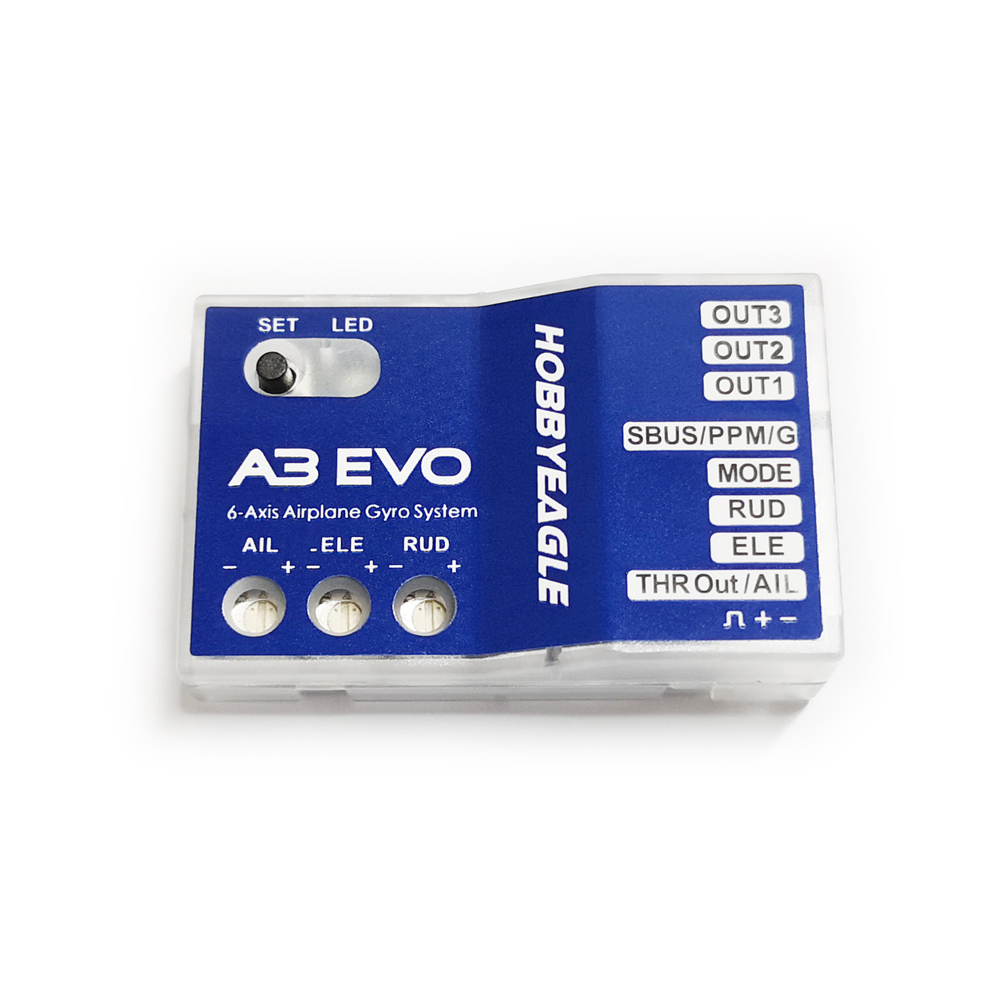
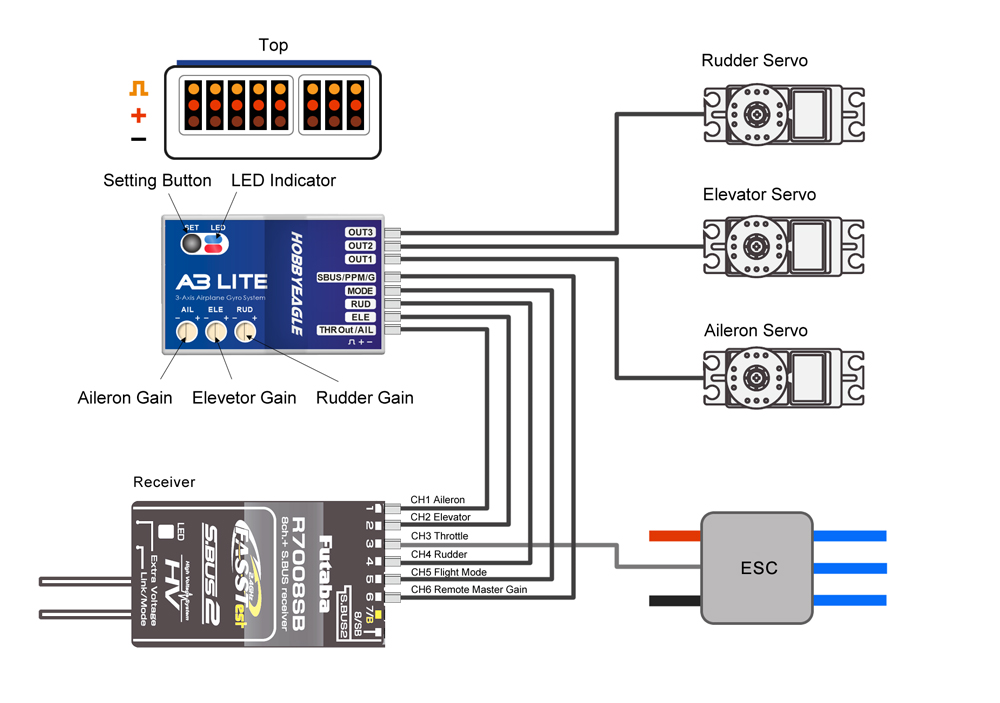
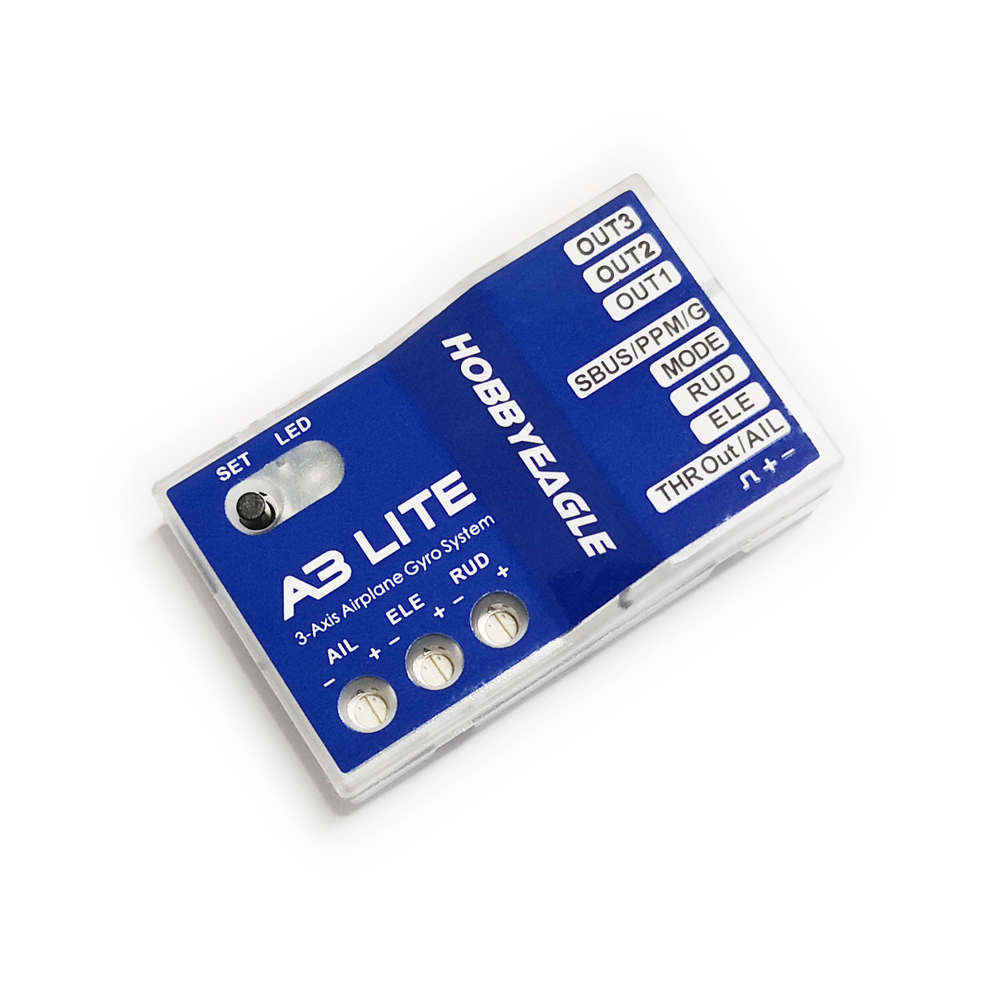
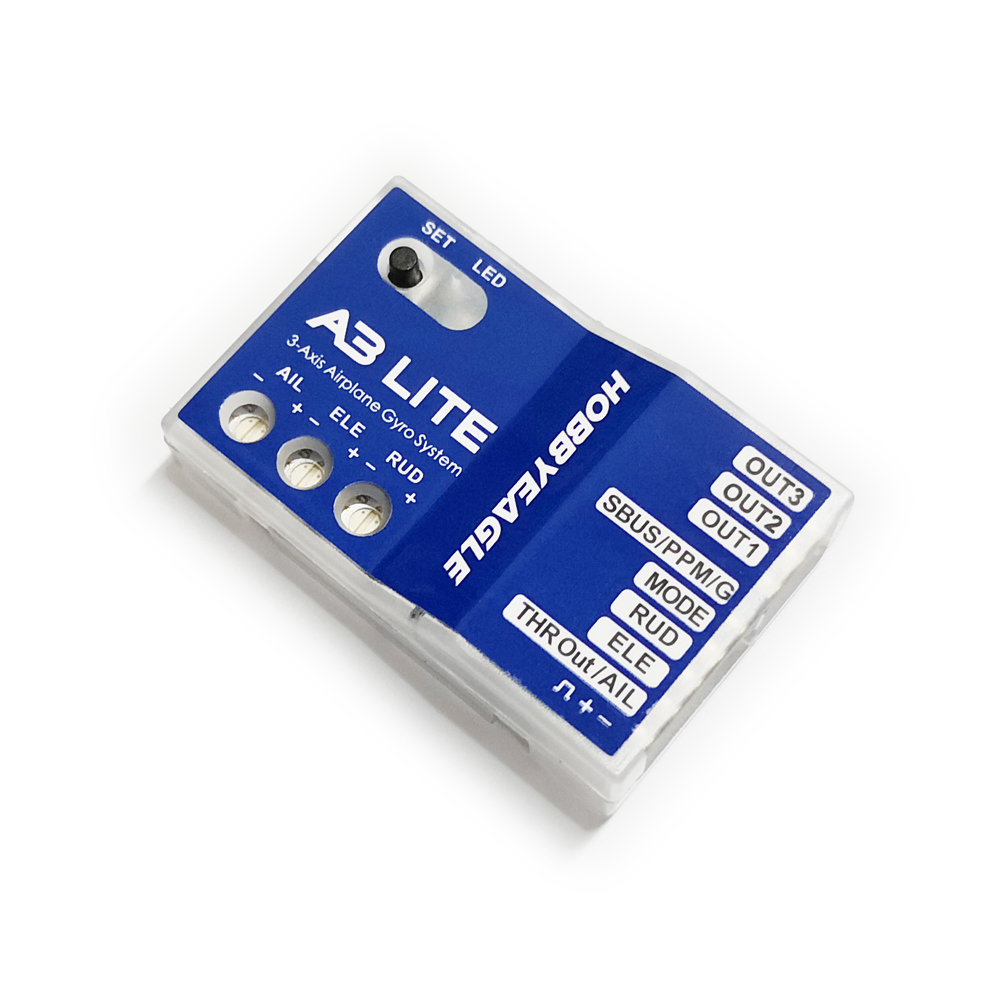
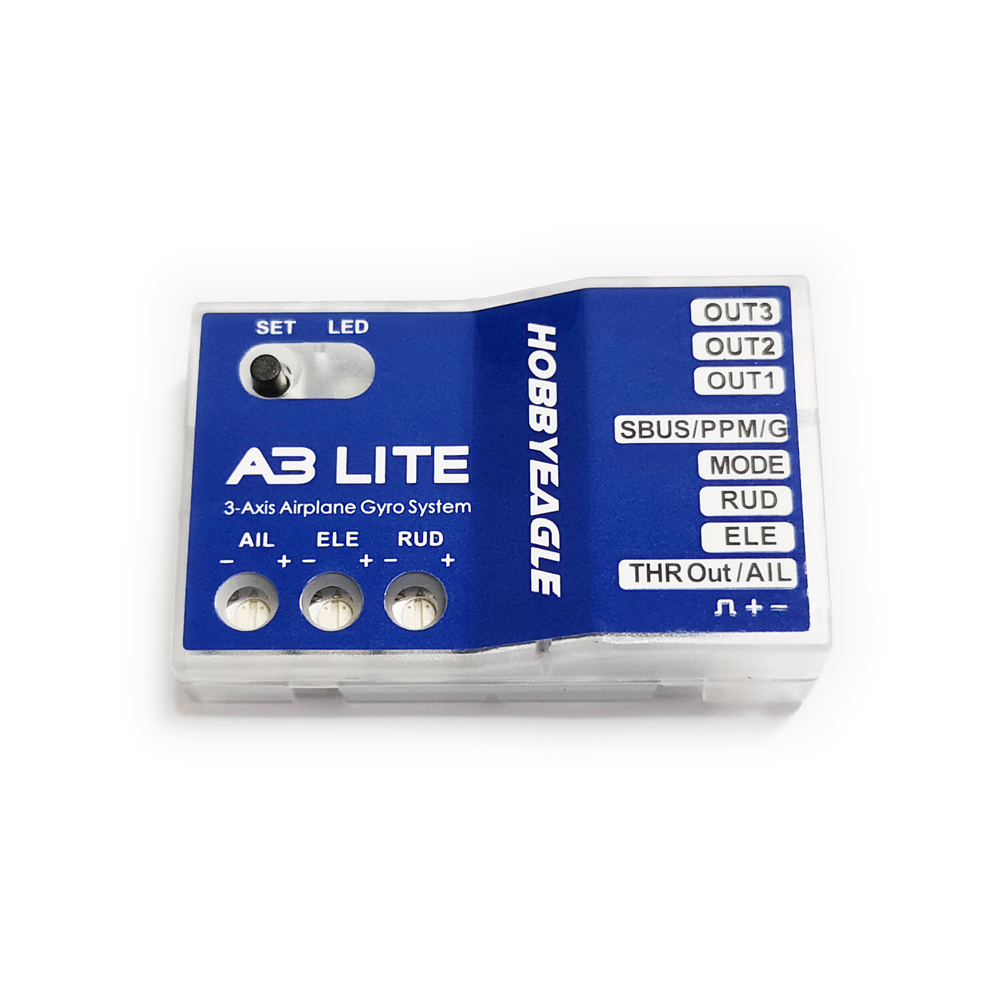
Standard PWM Receiver Connection
Notes:
-
[MODE] is used for flight mode switching of the gyro, connect it to a 3-way switch channel of the receiver to switch the flight mode in flight.
-
[SBUS/PPM/G] is used for remote master gain adjusting, connect it to a proportional channel of a volume or slide lever of the transmitter to tune the master gain in flight.
-
The ESC or throttle servo is connected to the throttle channel of the receiver directly without passing through the gyro.
-
Pay attention to the polarity of the plugs. The orange signal line must always be on the top and the brown on the bottom.

Single-line Receiver Connection
A3 EVO supports PPM and Futaba S.Bus serial receivers which allows you to connect the gyro to the receiver with one single wire. When using a specific type of these receivers the appropriate type of receiver channel allocation will be preset in the A3 EVO. Please refer to the table below and check if your radio transmits the channels in the correct order. If you use a standard PWM receiver with standard wiring layout the channel mapping does not apply. When A3 EVO is operating in single line receiver mode, the [THR Out/AIL] can be used as the throttle output channel for the ESC or the throttle servo if a mini receiver is being used which has no additional output connectors.
Table 1: Default Channel Mapping for Single Line Receivers
|
Serial Receiver Protocol |
AIL |
ELE |
THR |
RUD |
MODE |
GAIN |
|
PPM Receiver |
CH1 |
CH2 |
CH3 |
CH4 |
CH5 |
– |
|
Futaba S.Bus (FrSky SBUS or WFLY WBUS) |
CH1 |
CH2 |
CH3 |
CH4 |
CH5 |
– |
Please note that the Remote Master Gain is disabled in single line mode as default. Choose a channel number for gain channel in item 11 of the Setup Menu to activate this feature if needed.
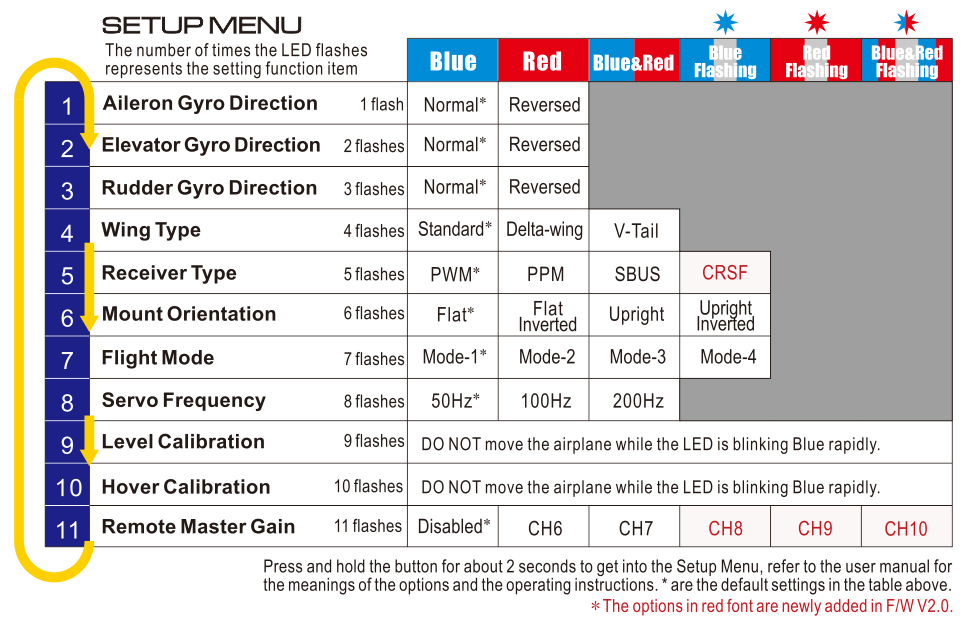
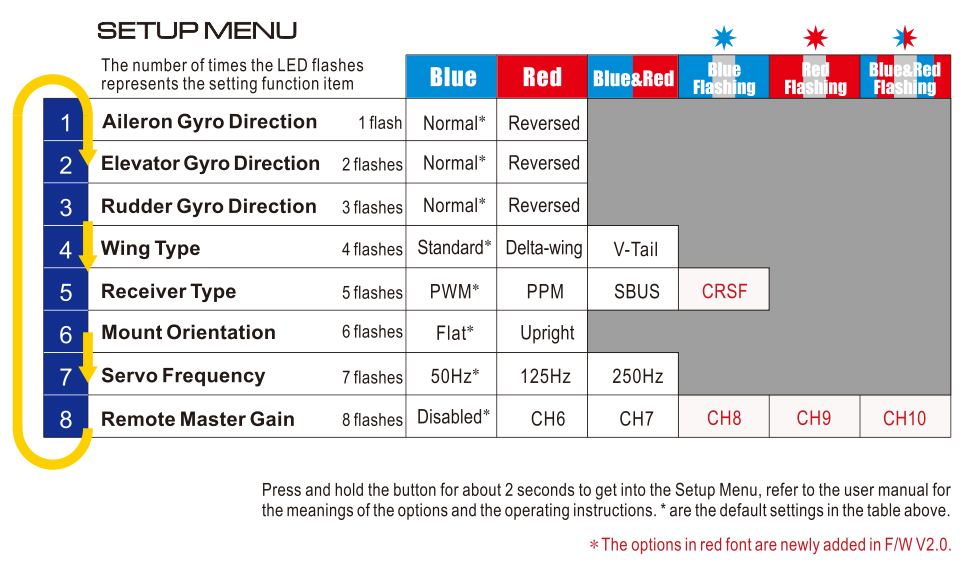
Setup Menu
To get into the Setup Menu, press and hold the button for about 2 seconds until the LED starts flashing Blue and Red quickly. The Setup Menu contains 11 setting functions which normally only need to be setup once after installation.
Function Selection
In the Setup Menu, the LED will flash Blue and Red several times every 3 seconds in a loop and the number of times LED flashes shows at which function item you are currently. For example, one Blue and Red flashing means the first setting “Aileron Gyro Direction”, after waiting about 3 seconds, a twice Blue and Red flashing means the second setting “Elevator Gyro Direction”, and so on.
Option Switching
When you reach the function that you wish to operate in, short press the button to get into it. After entering in, the current selected option is indicated by the color of the LED. Each short press of the button advances the option to the next value. After you finish making your selection, just wait for 5 seconds until the LED starts blink quickly which indicates that the modified is saved and then you will be brought back to the Setup Menu level automatically. If you do not want to change anything, just wait for timeout without any operation.
Exit of Menu
To exit the menu just keep the button pressed for 2 seconds again until the LED starts flashing Blue and Red quickly.


Features
-
3 Flight Modes: GYRO OFF Mode, NORMAL Mode and LOCK Mode.
-
3 Wing Type: Standard, Delta-wing and V-Tail.
-
Standard PWM receivers, PPM and Futaba S.Bus receivers supported.
-
Throttle output channel provided when using the PPM or S.Bus mode.
-
Separate basic gain adjustment for Aileron, Elevator and Rudder.
-
Remote master gain supported.
Flight Modes
A3 Lite provides 3 flight modes which can be switched by a 3-position switch of the transmitter during flight. The factory default mode allocation of the switch is NORMAL – GYRO OFF – LOCK. The color of the LED shows the current flight mode of the gyro while in use, as shown below.
|
Position |
LED Color |
Description |
Flight Mode |
|
Position-1 |
 |
Solid Blue |
NORMAL Mode |
|
Position-2 |
 |
LED Off |
GYRO OFF Mode |
|
Position-3 |
 |
Solid Red |
LOCK Mode |
NORMAL Mode
The NORMAL mode, also known as the ‘Rate mode‘, is the most basic function of the gyro. It works based on the rotation rate control of each axis of the airplane. When operating in this mode, the gyro will only correct currently occurring rotational movements, a momentary reaction will be applied to the servos when the airplane rotating on corresponding axis, after rotation the servos will move back to their neutral position as soon as the airplane standing still immediately. The NORMAL mode can be used with nearly any size and type of airplanes. It can effectively improve the stability and precision of the airplane and reduce the stall point specially.
GYRO OFF Mode
When operating in GYRO OFF mode the gyro will be deactivated completely, and the airplane will be completely under the control of your transmitter as it was before installing the gyro. This mode is usually used for testing purpose only.
LOCK Mode
The LOCK mode is also known as the ‘Attitude Lock mode‘, ‘3D mode‘ or ‘AVCS mode‘. Different from NORMAL mode, the gyro will perform a permanent correction for rotational movements on each axis constantly. That is when you release the sticks the airplane will stop and lock its current position immediately. This mode is well suited for practicing basic 3D maneuvers such as hovering or knife edge. Since it can help you to lock the attitude of the airplane, it is also helpful for landing.
Standard PWM Receiver Connection
Notes:
-
[MODE] is used for flight mode switching of the gyro, connect it to a 3-way switch channel of the receiver to switch the flight mode in flight.
-
[SBUS/PPM/G] is used for remote master gain adjusting, connect it to a proportional channel of a volume or slide lever of the transmitter to tune the master gain in flight.
-
The ESC or throttle servo is connected to the throttle channel of the receiver directly without passing through the gyro.
-
Pay attention to the polarity of the plugs. The orange signal line must always be on the top and the brown on the bottom.
Single-line Receiver Connection
A3 Lite supports PPM and Futaba S.Bus serial receivers which allows you to connect the gyro to the receiver with one single wire. When using a specific type of these receivers the appropriate type of receiver channel allocation will be preset in the A3 Lite. Please refer to the table below and check if your radio transmits the channels in the correct order. If you use a standard PWM receiver with standard wiring layout the channel mapping does not apply. When A3 Lite is operating in single line receiver mode, the [THR Out/AIL] can be used as the throttle output channel for the ESC or the throttle servo if a mini receiver is being used which has no additional output connectors.
Table 1: Default Channel Mapping for Single Line Receivers
|
Serial Receiver Protocol |
AIL |
ELE |
THR |
RUD |
MODE |
GAIN |
|
PPM Receiver |
CH1 |
CH2 |
CH3 |
CH4 |
CH5 |
– |
|
Futaba S.Bus (FrSky SBUS or WFLY WBUS) |
CH1 |
CH2 |
CH3 |
CH4 |
CH5 |
– |
Please note that the Remote Master Gain is disabled in single line mode as default. Choose a channel number for gain channel in item 8 of the Setup Menu to activate this feature if needed.

Setup Menu
To get into the Setup Menu, press and hold the button for about 2 seconds until the LED starts flashing Blue and Red quickly. The Setup Menu contains 8 setting functions which normally only need to be setup once after installation.
Function Selection
In the Setup Menu, the LED will flash Blue and Red several times every 3 seconds in a loop and the number of times LED flashes shows at which function item you are currently. For example, one Blue and Red flashing means the first setting “Aileron Gyro Direction”, after waiting about 3 seconds, a twice Blue and Red flashing means the second setting “Elevator Gyro Direction”, and so on.
Option Switching
When you reach the function that you wish to operate in, short press the button to get into it. After entering in, the current selected option is indicated by the color of the LED. Each short press of the button advances the option to the next value. After you finish making your selection, just wait for 5 seconds until the LED starts blink quickly which indicates that the modified is saved and then you will be brought back to the Setup Menu level automatically. If you do not want to change anything, just wait for timeout without any operation.
Exit of Menu
To exit the menu just keep the button pressed for 2 seconds again until the LED starts flashing Blue and Red quickly.


Reviews
There are no reviews yet.